


Sites and Environments
At WP Engine, a “site” refers to the grouping of three environments: production, staging, and development. These environments allow you to customize your development workflow or troubleshoot issues separately and safely.
For example, if your production website has an issue, you can easily copy to staging and troubleshoot and resolve the issue. Another option is to use development to create and test a new design, when you’re ready you can copy those changes to production. These environments all work independently which means you’ll never have to worry about changes to one environment impacting another.
About Sites
A site is an easy way to group several environments together under one name. This streamlines the process of organizing and deploying the related environments for a website.
Environments can also be easily copied within a site using the “Copy environment” tool.
You can only add a custom domain to the production environment in order to take it “live”. Staging and development environments can be used for your development workflow, and cannot have a custom live domain mapped.
Create Site
A “site” refers to the the container for related environments. Site names can be changed at any time and do not need to be unique.
If this is the first site on your account, you may be prompted to select a data center where your website will be hosted. Learn more about our data centers here. In general, we suggest selecting the location closest to the bulk of your customers.
- Log into the User Portal
- Click Add Site
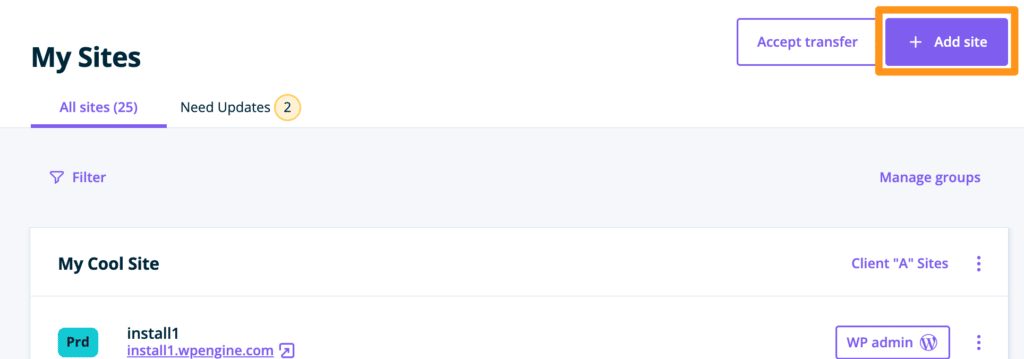
- Select how this site will be used:
- (Most common) This site is mine; it will count towards my site allowance.
- This site is transferable; You’ll be transferring the site to a client or collaborator.
- Choose a site creation option:
- Start with a blank site – Create a fresh installation of WordPress.
- Start with a guided experience – Create a fresh installation of WordPress with added template options, such as themes and sample content, preinstalled.
- Migrate a site – Choose this option when creating a new installation of WordPress to migrate to from another web host.
- Copy an existing environment to a new site – Make a copy of an existing environment on your account within a new site. This is a great option if you have a self-built starter template used for clients and want to transfer it later on.
- Move an existing environment to a new site – This option moves any existing environment on your account from one site to a new site. For example, if you are rebuilding a website this can help separate your old and new sites more easily.
- Click Next

- Fill in a Site name
- This name can be changed later
- Fill in an Environment name
- This is the first environment that will be created with the new site. The name must be unique and cannot have been used before.

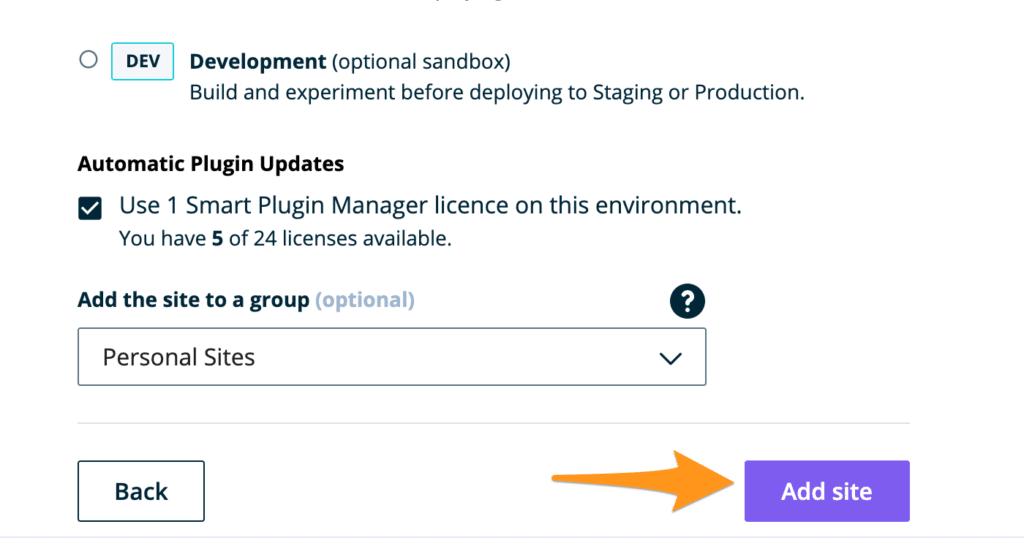
- Select the Environment type for this new environment
- Production — Intended to be taken live on a custom domain
- Staging — Intended for testing updates or debugging errors
- Development — Intended for building and development

- (Optional) Automatic Plugin Updates. This section allows you to install Smart Plugin Manager on the website if you have purchased this add-on.

- (Optional) Add the site to a group. For organization purposes only, the site can be grouped with similar sites on your account. Information on groups can be found here.

- Click Add Site
Edit Site Name
Sites, unlike environments, can have their names changed at any time. To change a site’s name there are two options; Quick Actions and Overview. Both options function the exact same way, so use whichever is easier for you.
Quick Action Edit
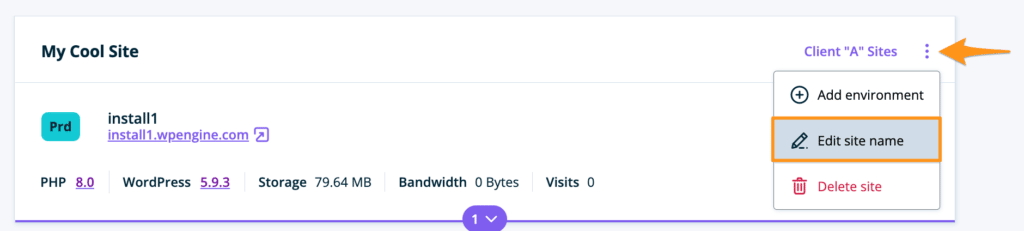
- Locate the Site name on the Sites page of the User Portal
- Expand the Quick Actions 3 dot menu to the right of the site name
- Select Edit site name
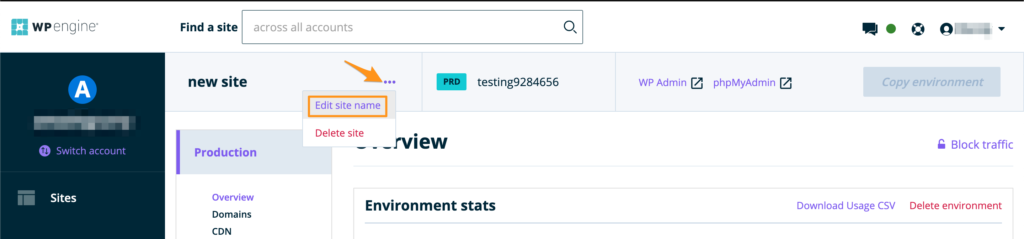
Overview Edit
Alternatively, the Site name can also be edited from the Overview page of any environment that is within that Site.
- Open the “Overview” page for the Site by clicking its name on the “Sites” page
- Locate the Site name in the top menu
- Expand the dropdown 3 dot menu icon
... - Click Edit site name
Delete Site
Deleting a Site also deletes every environment (PRD, DEV, STG) within it. Be sure you have any backups or copies created before deleting a Site. There are two ways in which a Site can be deleted.
Only “Owner” level User Portal users can delete Sites.
NOTE
Environment names cannot be reused, even when the original environment has been deleted (i.e. environmentname.wpengine.com).
Quick Action Delete
- Locate the Site you wish to delete on the Sites page
- To the right of the Site name, click the 3 dot menu icon:
... - Select Delete site
- You will be asked to confirm deletion by typing the site name.

Overview Delete
- Log in to the User Portal
- Click on the Site name listed on the Sites page
- Locate the Site name in the top menu
- Click the quick actions 3 dot
...menu icon - Select Delete Site
- Confirm deletion by typing the name of the Site

About Environments
Environments are individual instances of WordPress. This means you can work on an environment independently and without impacting other environments. There are three types of “environments”: Production (PRD), Staging (STG) and Development (DEV).
You can add a total of three environments per site with no additional charge, as WP Engine plan limits are per site and not per environment.
Domains
They will all share the same default URL structure environmentname.wpengine.com using their respective unique environment name.
For shared plans (Lite, Startup, Growth, Scale) only the PRD environment can have a live/custom domain mapped to it. On Premium plans, any of the three environments can have a custom domain added to it.
It is standard for staging and development environments to use different domains than your production environment. If you are using a premium service that issues license based on domain, and require that to also be used on multiple environments, you may need to purchase additional licenses for each environment or inquire about staging services. Some premium services that authenticate based on domain will also offer a staging mode.
Server Configuration and Media
Each environment has the exact same default server configuration and caching, which make them useful for accurate testing and building. Be aware, however, that any custom redirect, cache exclusions or Nginx rules do not copy between these environments.
When using LargeFS, media is stored off-site which means these files cannot be copied by our server. A fall-back rule can be put in place by Support on any necessary STG/DEV environments, or media can be copied in Amazon S3.
Create Environment
When a site is first created, you’ll be prompted to add a new environment to it automatically during the process. You will receive an email once the environment has been set up. If you are copying from an existing environment, this process can take some time to complete.
Add Environment to Existing Site
If you already have an environment added to a site, you can add additional environments using these steps.
- Log in to the User Portal
- Click the site name listed on the Sites page
- Locate the dropdown containing the environment name at the top
- Click Add production environment, Add staging environment or Add development environment from the menu

Next you’ll be prompted to fill in a name, environment type, and other setup options.
You will receive an email once the environment has completed the setup process. If you are copying from an existing environment, this process can take some time to complete.
Delete Environment
Deleting an environment will not impact any other environments on your account or within the site. Before deleting an environment be sure to download a backup point. For security purposes, only Owner level users can delete environments.
Environment names cannot be reused, even when the original environment has been deleted.
There are two ways to delete an environment:
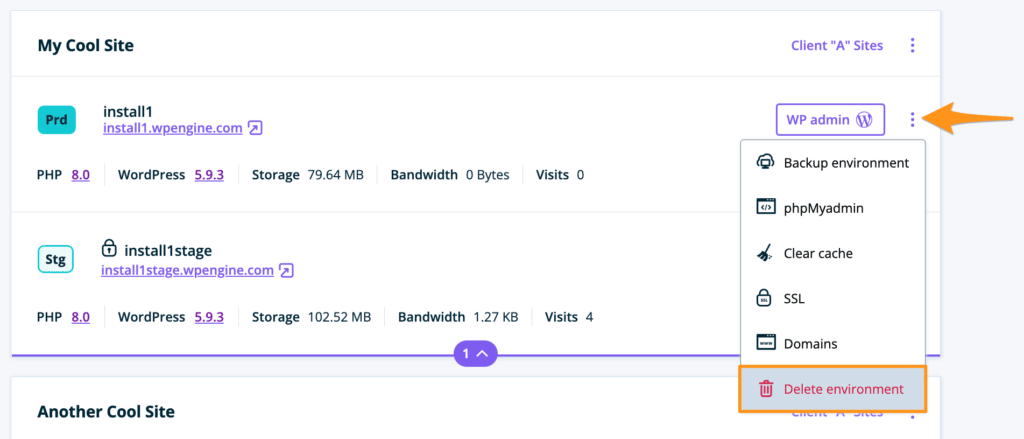
Quick Action Delete
- Log in to the User Portal
- Locate the environment name listed on the Sites page
- Click the 3 dot quick actions menu
...to the right of the environment name - Select Delete Environment
- Confirm deletion by typing the name of the environment
Overview Delete
- Log in to the User Portal
- Click on the environment name listed on the Sites page
- On the far right, locate and click Delete environment
- Confirm deletion by typing the name of the environment

NEXT STEP: Learn how to copy an environment